



The insert molding process places a metal insert into the mold cavity and forms plastic around it in one cycle, replacing a separate assembly step. The path from print to validated part runs through design for manufacturability review, tool design and fabrication, insert preparation and robotic placement, molding with in-process inspection, and final validation. Each stage constrains the one after it, which is why the earliest decisions carry the most weight.
The insert molding process combines a metal component and a molded plastic body into a single finished part. Rather than molding plastic, preparing metal, and then joining the two in a separate assembly step, it places a metal insert directly into the mold cavity and forms plastic around it in one cycle.
For engineers and buyers evaluating the method, the useful question is what actually happens between a print and a validated production part. The stages below follow that path from early design review through tooling, molding, inspection, and final validation.
What the Insert Molding Process Involves
At its core, the insert molding process exists to combine the properties of metal and plastic in one product. Metal carries load, conducts, threads, and resists wear. Plastic insulates, seals, adds geometry that would be expensive to machine, and protects the metal underneath. Bringing them together in the mold produces a bond that a downstream assembly operation cannot easily match.
Typical applications include wiring, insulated pipes, and hand tools such as screwdrivers, where a metal shaft or conductor needs a durable plastic body around it. On the production floor, the work breaks down into a repeatable sequence, and each stage constrains the one after it.
Five stages of the insert molding process carry a part from an approved print to a validated production component.
| Stage | What Happens | What It Determines |
|---|---|---|
| 1. DFM review | Part and insert reviewed for mold behavior | Whether the insert can be located, held, and encapsulated |
| 2. Tool design and fabrication | Mold designed and built around the insert | Locating features, shutoffs, venting, cooling, ejection |
| 3. Insert preparation and placement | Inserts inspected, staged, robotically loaded | Placement repeatability across a long run |
| 4. Injection molding | Plastic flows around the metal in one cycle | Encapsulation, bond strength, insert position under flow |
| 5. Inspection and validation | In-process checks, dimensional and pull testing | Whether the part matches the print and holds in service |
Where the Insert Molding Process Starts: Design for Manufacturability
Before any steel is cut, the part gets reviewed for how it will behave in a mold. The insert itself drives most of that review. Engineers look at how the insert will be located and held, how much of its surface needs to be encapsulated, and which features must stay clean and free of plastic. They also consider how the insert will react to melt temperature and injection pressure, since a thin or unsupported metal feature can shift or deform under flow.
Wall thickness around the insert matters as well. Plastic that is too thin may not fill consistently, while plastic that is too thick invites sink and longer cycles. Gate location is chosen so material flows around the insert evenly instead of pushing it to one side. Working through these questions during design engineering, rather than after a first tool is cut, is the cheapest form of problem solving available in the insert molding process.
Insert location, encapsulation coverage, wall thickness, and gate position are all decided during design review. Revisiting any of them after a tool exists means a tool modification, a requalification, and a schedule slip that someone has to explain.
Tool Design and Fabrication
Tool design and fabrication turn the approved part design into the hardware that carries out the insert molding process. The mold has to do more than form plastic. It has to locate the metal insert accurately, hold it during injection, seal against it where plastic must not travel, and release the finished part without damage.
That means designing positive locating features, shutoffs that contact the insert cleanly, venting that suits the flow path, and cooling that accounts for a metal component absorbing and holding heat differently than the surrounding resin. Ejection is planned so the part comes out square and undamaged.
New Concept Technology designs and builds its own tooling in house at its 200,000 square foot facility in Emigsville, Pennsylvania. Keeping tool design and fabrication under the same roof as molding shortens the loop between a tooling change and a new sample, which is often the difference between a short qualification and a long one.
Insert Preparation and Robotic Placement
Inserts arrive as stampings, machined components, terminals, pins, or fasteners. They are inspected, cleaned, and staged so they present consistently to the machine. Contamination, burrs, or dimensional drift on an insert will follow the part through the rest of the insert molding process, so this checkpoint matters more than its simplicity suggests.
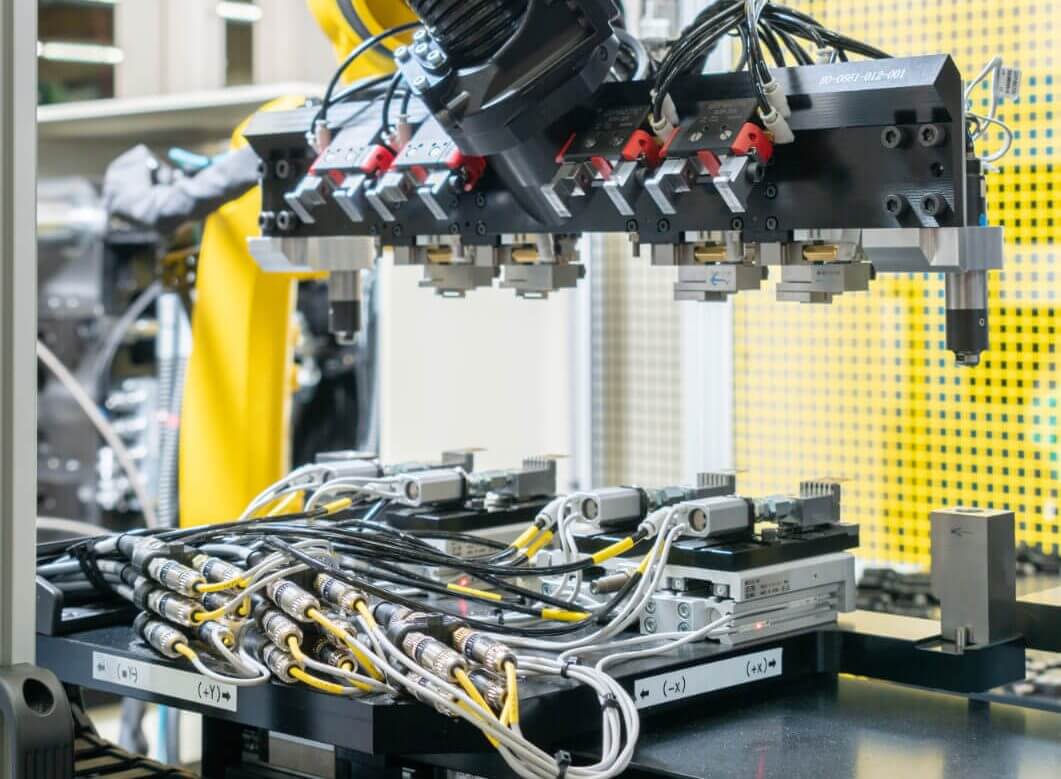
Placement is where automation earns its keep. At NCT, a six axis robotic arm with laser displacement technology places the metal insert into the mold cavity. The laser measurement confirms position rather than assuming it, which keeps placement repeatable across a long run and reduces the variation that manual loading introduces. Consistent placement protects the tool as well, since a misloaded insert can damage a shutoff surface in a single shot.
A six axis robotic arm with laser displacement technology confirms insert position rather than assuming it, keeping placement repeatable across long runs and protecting shutoff surfaces from a misloaded insert.
Molding, Transfer, and In-Process Inspection
With the insert seated, the mold closes and injection molding begins. Plastic flows around the metal and forms the finished shape, bonding to the insert as it cools and shrinks against it. The result is a single component rather than two parts held together by a fastener or adhesive.
Process control at this point is ordinary injection molding discipline applied to a more sensitive part. Melt temperature, injection speed, pack pressure, and cooling time are monitored because each one influences whether the insert stays put and whether the plastic fully encapsulates it.
After the cycle, robotic soft sensing follows the part as it transfers to the next production stage, handling it in a controlled way instead of dropping it. In-process checks happen alongside that transfer, catching short shots, flash on sealing surfaces, or a shifted insert while the run is still in progress. Overmolding of a second material follows here when a design calls for it.
Validating the Finished Part
Final validation closes the insert molding process by confirming that the part matches the print and performs as intended. Dimensional checks verify critical features on both the plastic and the metal. Retention and pull testing confirm the strength of the metal to plastic bond. Visual inspection covers encapsulation, sealing surfaces, and cosmetic requirements. Electrical or functional testing applies where the insert serves a circuit.
Documentation is part of the deliverable. NCT operates to ISO 9001:2015 and ISO 13485:2016, with ISO 14644-1 cleanroom capability for medical and other sensitive work, so validation results are recorded in a way that supports regulated programs.
Done well, the insert molding process delivers what it promises: faster production by eliminating a separate assembly step, reduced weight, added strength from the metal to plastic bond, and longer part life because the plastic protects the metal it surrounds.
Frequently Asked Questions
What is the insert molding process?
It places a metal insert directly into the mold cavity and forms plastic around it in a single cycle, producing one finished component instead of a plastic part and a metal part joined later in a separate assembly step.
What are the stages of the insert molding process?
Design for manufacturability review of the part and insert, tool design and fabrication, insert preparation and placement, injection molding of the plastic around the insert, then in-process inspection and final validation.
What does a mold for insert molding have to do beyond forming plastic?
It has to locate the metal insert accurately, hold it during injection, seal against it where plastic must not travel, and release the finished part without damage, which means positive locating features, clean shutoffs, appropriate venting, and cooling that accounts for the metal absorbing heat differently than the resin.
How is the insert kept from shifting during injection?
In the insert molding process, robotic placement with laser displacement confirmation seats the insert consistently, and the tool provides positive locating and support. Melt temperature, injection speed, pack pressure, and cooling time are then monitored because each influences whether the insert stays put.
What is checked during final validation?
The insert molding process closes with dimensional checks on both the plastic and the metal features, retention and pull testing of the metal to plastic bond, visual inspection of encapsulation and sealing surfaces, and electrical or functional testing where the insert serves a circuit.
Why does in-house tooling shorten qualification?
Keeping tool design and fabrication under the same roof as molding shortens the loop between a tooling change and a new sample, which is often the difference between a short qualification and a long one.
Have a part that combines metal and plastic?
New Concept Technology runs design engineering, tool design and fabrication, stamping, molding, and insert molding on one campus, so insert tolerances and mold conditions get reconciled before the first shot. Contact us to talk through whether the insert molding process fits your part.
Contact Us →Sources
| Organization | Resource |
|---|---|
| Encyclopaedia Britannica | Injection Molding: Materials Processing |
| Encyclopaedia Britannica | Plastic: Processing and Fabrication |